
|
|


|
| |
| |
|

Well, it's not the best looking one on the road but at least it is on the road! But then, just about anything beats the crusher. I actually paid for this paint job! At the time, I hadn't the place or  the tools to paint it myself. About 3 months later, it began to peel. Annoying, to say the least! However, as I had moved to another state there was little that could be done about it. It was driven on a regular basis without any mechanical problems. It has, in fact, remained one of the most reliable cars that I have owned. Just as we moved into our present house, it blew a water pump. It was parked and forgotten about. All of the hassles of moving into a new house, the arrival of our son a few years later, followed by Leslie's health problems and somehow, 12 years had passed! A few months ago, the decision was
  made to resurrect the old girl. It was basically sound mechanically and had a new interior. Just a bad case of neglect. You can read about my endeavors at "Bringing My Roadster Back to Life". While a bit lengthy, it is actually an abridged version. The mileage is low (the odometer has NOT turned over nor has it been disconnected) and most things on the car are original. The engine, transmission, and rear end have never been apart. Well, other than a new clutch. It had under 30K miles when I purchased it in February of 1973. Even the dash is good shape. It has one crack but I'm going to leave it as is. It is back together and running as I type. I couldn't stand it any longer and drove it around the yard the other night. I'm sure that the neighbors have
  long since given up trying to understand my antics. A small problem of insurance. All I could find locally (Hicksville, USA!) was standard, full bore coverage. As I plan to drive it only on a limited basis, the idea of paying full rates was far from appealing. So, I went to one of the "Classic Car Insurers". The same coverage with a few limitations was about 1/4 of regular rates. As soon as they confirm coverage it's off to the DMV and hit the open road! I opted for Haggerty Classic Insurance Co. Very nice people with good rates.
So, without further ado, let us decend into the wonderful world of the Datsun Roadster! I hope that you will find it informative, interesting, and perhaps a bit entertaining.
Due to the fact that we live in a 150 year old house, I have a great many demands made on my time. (Check out the link to "Old House Living") The Roadster doesn't receive the attention that I would like to give it. But, stay with me! This is an ongoing project and will be completed! I just finished building a new set of cabinets and will have the kitchen done shortly. At which time the Roadster is going to get my undivided attention.
25 Sept 01 INSURANCE ARRIVED!!! I love modern technology. They sent it via FAX so I wouldn't have to wait on the mail. After a quick trip to the DMV it is off for the safety inspection. One nice thing about living in Hicksville: no smog inspections! I took off leaving my tool box and cell phone at home. Instead of going and getting them, I decided to take a quick test drive first. It was the first time in 30 years that I have driven that car without having a tool kit on board. Big mistake! I took her out on a secondary highway north of town. A few miles out I turned around to return home. The engine is thoroughly warmed up. Time to put it to it. First gear and WOT. What a rush! Just as she hit 6000 RPM the engine quit cold! Or, at least I thought it had. Turned out that it was running at a perfect idle with the throttle cable dangling. There I am in the middle of nowhere sans tools and phone. The only thing I had on me was a pocket knife. I considered cutting my throat but the damn thing was too dull! Fortunately, the throttle cable was new. There was enough length to loop it around the bottom of the drum and tie it off, more or less. I proceeded to motor home slowly and carefully. A note on attaching the throttle cable. Make sure that it is behind the clamp. The clamp fits closely to the drum. This makes it possible to clamp the cable between the clamp and the edge of the drum. It will actually hold in this position for a while. But, sooner or later, it will pop out. I feel particularly stupid as I have done this before!
Reattach the cable, grab the tool box and phone, and back on the road again. Everything went well other that it was running too hot. This surprised me as this engine has never overheated in 30 years. Especially after de-smoging and re-curving the distributor. Even in the Arizona desert it never got hot. Well, back to the house. Harking back to the thermostat, my first thought was rust and mung plugging up the cooling passages. I pulled the thermostat and ran a jug of cooling system cleaner through it. It flushed clean and clear with no sign of a problem. The thermostat was open when it was pulled and closed as it cooled. No problem here. Another quick note on the cooling system. Don't use tap water! If you have soft water, go ahead. But, this is uncommon. Most is hard. Ours you practically have to strain through your teeth! Hard water will raise holy purple hell with aluminum. Cast iron doesn't much care for it either, for that matter. After flushing, clean all of the water from the system (a wet/dry shop vac works quite well) and use distilled water with your coolant of choice. Personally, I haven't found any difference between brands of coolant. Ethylene glycol is ethylene glycol regardless of whose name is on the bottle. While you are at it, add a can of water soluble oil to the system. Your water pump will love you for it.
Another test drive and it is still running hot. Hmmmmm..... now what the hell??!! The thought of disassembling my engine began dancing through my brain. Better check the fan to make certain. Sure enough, the fan clutch had died. I know, I know, what am I doing with a fan clutch still on the car? I can just see the disapproving looks. The truth of the matter is, this is the first time in 30 years it has ever failed. While idling it during the "test and tune" stage, it was working fine. While warming it up this morning I heard it cut in. Well, I guess there has to be a last time before something croaks. This must have been that time. It just so happens that a 4 blade fan and spacer are on order as I
type. They just haven't arrived yet. Time for the "cure" For those having not experienced this particular malady, there is a time-honored cure for it: two large sheet metal screws! On the fan hub right next to the pulley are four holes. Run a large sheet metal screw into two of them 180 degrees apart. I prefer to use two instead of the usual one. It keeps it balanced and if one happens to come out, you still have one in place. This should end my cooling problem. As soon as the new fan blade arrives, it will be cured forever.
Finally! I get to actually drive it. Between the urethane rear end kit, new Koni's, a set of Pirelli P7000's, and the fact that I hadn't driven the car in years, I was somewhat timid to say the least. As I got the feel of things I really liked what I felt. The shocks are quite stiff, the urethane rear end kit took the "mush" out of the rear suspension, and the Pirelli P7000's stick like glue! This car corners like a cat on a shag rug. I couldn't get the tires to break loose. It took corners like it was on rails with virtually no body sway. I finally broke them loose on my last run. Heading out on a secondary highway I saw a turn off with total visibility in all directions. Looked like the place to try it. Down shift, WOT, and into a right angle turn at 40 MPH. The rear broke into a slight over steer. The break was smooth, progressive, and predictable with no surprises. I do love these tires! I'm not sure what my neighbor thought of it. She wanted to go for a ride and happened to be in the car for the previously described turn. The poor lady nearly pee'ed her pants. Oh well, sorry about that!
It appears that I spoke too soon. It is still heating up. Well, it is now late in the afternoon and I have been up all day. As I am working a mid rotation I had best get some sleep. More to follow I'm sure!
27 Sept 01 I don't quite understand this. The temperature is running in the low 70's. It will run fine for 30 or 40 minutes. Temp right at mid scale (180 degrees?) with a 180 thermostat. Then, suddenly it jumps toward the top of the scale and stays there. It doesn't go into the red but it's getting close. As the gas gauge is holding steady I can rule out the instrument regulator. I have never seen an engine act this way. I wonder if the temperature sender or the thermostat has gone schizoid? One quick check is to install a temporary temperature gauge. Think I'll give it a try tomorrow.
5 Oct 01 So much for tomorrow. We live in a house that is about 150 years old. Having torn out a bathroom due to decrepit plumbing my wife is insisting that I work on it. Instead of my Roadster! I'm going to have to trade her in. (My wife not the Roadster.) Back to the car! Time to make a quick run to Auto Zone for a cheap add-on temp gauge. I've finally found a use for the opening where the thermal demodulator used to live. Since it is a 1/2" pipe thread the temp gauge adapter will screw right in. Off again! According to the new gauge, the one in the car is right on the money. Which, of course, means that my Roadster is in fact overheating. While removing the new temp gauge I bumped the fan. The damn thing is loose again! Either the screws weren't long enough or broke off. Nuts to this noise. I'm going to let it sit until my parts order gets
here. After the new fan is installed we'll see how it goes.
1 Nov 01 Damn! The Crown Victoria died. Leslie was somewhat less than thrilled. She finally got it started and limped home. She then proceeded to park it in the garage. Two guesses who had to push it out! Replaced a badly plugged fuel filter but no luck. Had to have it towed to the local repair establishment. I'll let the repair shop take care of it. Any car that doesn't have carburetors I don't mess with.
Took a little longer than I expected to get the parts. Interesting side note: there is a vendor that claims the rubber tail light gaskets are NLA and had them specially made. Just for the record, they are indeed still available from Nissan. Back ordering these items was the cause of my order being delayed. Plus, the fan spacer didn't come with the order. NLA? Many thanks to Nik Burns for donating a spare spacer to the cause! Datsun people have got to be the best! The new fan went in without a problem. Didn't even have to pull the radiator. It was a bit cramped but no problems. I have got to acquire a 1/4" air ratchet! Sorry, back to the car. Went for a test run with nearly the same results. It is running cooler but still hotter than normal. It will run fine for about 45 minutes. I was really getting on it after it warmed up. Then, for whatever reason, the temp jumps up and stays there. WOT or puttering around town gives the same results. Even though it is new, I'm wondering if the thermostat is going schizoid. Just for grins, I think I'll pull it and see if if anything changes.
3 Nov 01 My car hates me! That, or it's just getting even with me for neglecting it for so long. I went out this morning to to pull the thermostat. I was greeted by a large puddle of coolant creeping across the garage floor. Scratch one radiator. Hopefully it can be repaired. I'll find out on Monday.
8 Nov 01 I'm going to stop making projections regarding work on the Roadster. Things keep getting in the way. I finally got the radiator into the shop. Seems that it is non repairable. Just what I wanted to hear. However, all is not lost. It is possible to have a new core made for it. If all goes well ( that would be a first! ) it should be ready next week. The new core will run $150 plus putting it all together. All this and I'm still not sure about the heating problem. I'm hoping that the leaking radiator caused it the last time but I'm not holding my breath.
14 Nov 01 While waiting for the radiator I thought that this would be a good time for a little painting. The brackets, fan shroud, and reservoir tank were sand blasted and painted. The brackets and shroud were coated with a rust conversion primer. Strange stuff to say the least. It went on clear and turned black as it reacted with the steel and rust. Three coats and it is as black as a coalies butt. The tank was another matter. After a pass with the sand blaster, several pink spots showed up. A second pass and the spots turned into holes. Soldering sheet metal is something of an art and I'm no artist. It's not pretty but it now holds pressure. A new one was ordered from Nissan but I haven't heard if it is still available.
21 Nov 01 Picked up the radiator today. $160 and they did a beautiful job. A new core and all the seams freshly soldered. It should last for many years to come. I saw the old core. It should well explain the heating problem. At least 50% of the core was blocked! This is a bit surprising as I have always used distilled water. I am more than a bit curious as to where the calcium came from! The guy at the radiator shop was at a loss as well. If all goes as planned (will I never learn??!!) the radiator should go back in tomorrow. Famous last words...........
22 Nov 01 The radiator was actually installed as planned! It all went together without a problem. I then made the rude discovery that I was out of distilled water. There I was, running all over town trying to find an open store that carried distilled water. Ever try to find an open store on Thanksgiving day in Hicksville? I finally drove to Wal Mart (where else?) to get the water. Fill up the cooling system and off we go. I noticed the last time I drove it that it wasn't running right. This trip was even worse. Time to check the timing. Wow! It was way off. Dwell was running well over 50 degrees and the timing was way to advanced. I would swear that I checked it before. Either I forgot or didn't get the screws tightened down. IDIOT! A few minutes with the dwell meter and timing light will take care of this problem. Over the next few days it was taken on several good runs. After beating the snot out of it a few times, the temp never went above the hash mark. This should be at or under 180 degrees. I now feel confident in saying that the cooling system is back on track. It has run at this temp for 28 years so I assume that it is correct. With the timing set properly it runs like a striped assed ape! It is truly a joy to have it running again.
Only one problem on the board now. I can hear a slight chain buzz when it is started. The infamous U20 death rattle! Thanks to Brian Rourke (a fellow Roadster nut from Down Under) for donating some custom made shims for the upper tensioner. As soon as I get a gasket I'll take care of this problem. As it is now 34 degrees outside, the Roadster won't see much use before next spring. Plenty of time to do some other things that I would like to do. Not the least of which will be a new top. It has been a number of years since I did this job. As I recall it is fairly straight forward. My memories of this endeavor can be found at "Putting a Top on a Roadster". When I replace the present one I'll post some pictures.
12 Dec 01 As if my time isn't short enough the way it is we have the holidays! The Christmas season is upon us. Bah! Humbug! Finally there is some free time to work on the Roadster. The timing chain has more slack than I realized. I don't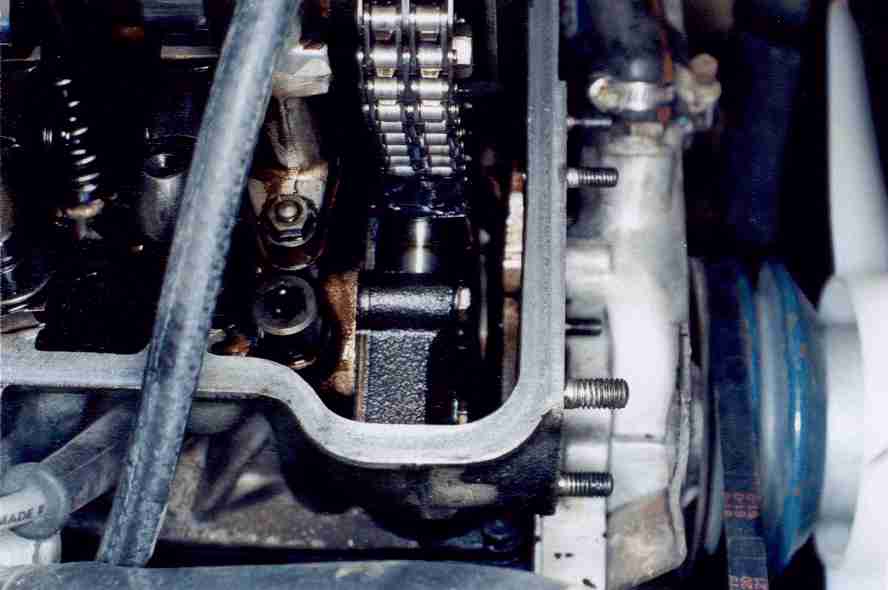 think shims are going to get it done. But, it's worth a try. When you look down on the upper chain tensioner here is what you will see. (These pictures are linked to larger views.) The idea being that spring/oil pressure will keep the slack out of the chain. All well and good until the chain stretches too far. The spring no longer has enough strength and/or length to hold the slack out of the chain. The spring takes care of the task until the oil pressure comes up. This is why it only rattles during start up. The rattle is caused by the chain slapping against the chain guide. The 'L' bracket will eventually break off and fall into the timing chains and gears. This will cause mass destruction within your engine. The best description that I have seen is the following quote from Gordon Glasgow: "If you can't quite form an image of what that implies, drop some nuts and bolts into your food processor and push "Liquefy." " BTW, I suggest that you visit Gordon's sight (linked to his name above). It is quite interesting and has a WEALTH of information about Roadsters. Gordon himself is well respected for his knowledge and is always willing to help.
 The place to look is right here. On the larger picture the area is circled. This is where the chain hits and eventually causes the bracket to break off. It is actually part of the upper timing chain guide. It is really quite a handy item. It a allows you to remove the gear from the cam without losing you timing index. The gear is bolted to the bracket and allows you to remove the cam or even the head if the need arises. Some people cut off the 'L' portion. This is treating the symptom rather than the disease. The problem is the chain stretches with age. Even with the bracket removed, the chain still needs to be replaced. Eventually, it will break and cause the same mass destruction. By hitting the bracket it gives you some warning that the chain is shot.
 One temporary fix is to place shims on the tensioner. This will sometimes keep the chain in place for a little longer. The trick is removing the tensioner assembly without dropping parts. The best way to accomplish this is a large nylon wire tie as shown in the picture. Everything from bailing wire to hose clamps have been used but the wire
tie is way to do it. The bolts are retained by a plate with the ends bent against the flats of the bolt head. It resembles a flattened barbell with a hole in each end. Take a punch and work the ends down so the bolts can be loosened. Then lift the tensioner, bolts, and all out through the top. Remove the tensioner from the body, place the shims on the shaft, and reassemble. Place a wire tie on it to hold the thing together. Now comes the fun part. The tensioner assembly, bolts, retainer, and gasket have to replaced as a unit! It isn't as bad as it sounds but it is something of a PIA. Stick the gasket on with your favorite gasket glue, slip the bolts and retainer into place and carefully lower it into place. The assembly actually sets at a slight angle, not straight across. It needs to be rotated clockwise (viewed from front) slightly to get the bolts to align. Once everything is bolted in, the edges of the retainer have to be bent against the flats of the bolts. They are hard to get to and even harder to bend into place. The one on the left is a ROYAL PIA! However, do not neglect this step!! I assure you that you will regret doing so later.
One temporary fix is to place shims on the tensioner. This will sometimes keep the chain in place for a little longer. The trick is removing the tensioner assembly without dropping parts. The best way to accomplish this is a large nylon wire tie as shown in the picture. Everything from bailing wire to hose clamps have been used but the wire
tie is way to do it. The bolts are retained by a plate with the ends bent against the flats of the bolt head. It resembles a flattened barbell with a hole in each end. Take a punch and work the ends down so the bolts can be loosened. Then lift the tensioner, bolts, and all out through the top. Remove the tensioner from the body, place the shims on the shaft, and reassemble. Place a wire tie on it to hold the thing together. Now comes the fun part. The tensioner assembly, bolts, retainer, and gasket have to replaced as a unit! It isn't as bad as it sounds but it is something of a PIA. Stick the gasket on with your favorite gasket glue, slip the bolts and retainer into place and carefully lower it into place. The assembly actually sets at a slight angle, not straight across. It needs to be rotated clockwise (viewed from front) slightly to get the bolts to align. Once everything is bolted in, the edges of the retainer have to be bent against the flats of the bolts. They are hard to get to and even harder to bend into place. The one on the left is a ROYAL PIA! However, do not neglect this step!! I assure you that you will regret doing so later.
All this and I was correct in my initial assessment: the chain is too loose for shims to help. Oh well! Stayed tuned for the next installment. Replacement of the chains and gears is a real treat! Fortunately, I've had a set on the shelf for years just waiting for this day to come. And, they cost a WHOLE lot less than the price tag they carry today.
 Nothing like a kid with a new toy. I finally broke down and bought a buffing setup. I have really kicked myself for not taking a 'before' picture. The valve cover looked absolutely terrible. A short time at the buffing wheel and it shines like a mirror. Pay no attention to the green on the valve cover and carb domes. It is only a reflection. They are actually quite shiny. The rest of the car looks like total crap, but man does the aluminum shine!
AS WE TREK EVER ONWARD.....
I finally got around to changing the timing chains. I got caught up in a case of "while I'm at it"-itis and did a couple of other jobs as well. The alternator had been changed out 30-years-ago because Datsun wanted $125 for a voltage regulator and no one else had them at that time. A while back I got hold of a very nice exhaust manifold and had it Jet Hot coated. Mine had cracked years ago. I brazed it up and it has held up surprisingly well but figured this would be a good time to change it out.
ALTERNATOR REPLACEMENT
Many people replace the stock alternator. Some want more power and some do it due to failure of the original parts. Mine was changed due to failure. At the time I stuck a 55 amp Motorola in it and left it for all these years. Frankly, I was very lucky I didn't fry something. The Roadster is not wired to handle a 50 or 60 amp alternator. The wire is too small for this much current. You run the very real risk of fire and/or blowing up your ammeter unless properly rewired. Way too much trouble for something I don't personally need. I decided that this would be a good time to finally do it right.
Personally I fail to see why people desire a high power alternator unless they actually have need for it. Unless you are running electric fans or 'flame thrower' class (as in not street legal anyway) driving lights any 30-35 amp alternator will handle the load. Without lights the load runs 1 to 2 amps. Factory lights will add about 10 amps. Add another 7 or 8 for the wiper and blower motors. This is a total of approximately 18 to 20 amps. The one I put in is rated for 35 amps. Driving lights would run it a bit close but it's still doable. It is the one used in a 1980 Datsun 720 pickup (among others) and rated for 35 amps. Ask for p/n 14231 at any parts store and it will come up. The best price I found was $50 at O'Reilly's.
If you opt for a high power alternator DO NOT run the output through the existing wiring! If you decide to go this route install a junction block. Attach the alternator, battery, and any high amperage loads to this point. Also attach a fusible link rated for 30 amps going to the wiring harness. This basically renders your ammeter useless but it's the only way I know to do it without risking serious damage.
Next comes the decision between a one-wire or a three-wire alternator. M.A.D. Enterprises has an excellent article on this subject. Check it out and decide for yourself. I prefer a three-wire but to each his own.
If you go with a one-wire simply mount the alternator, hook up the 'B' (output) terminal, cap off the black/white stripe wire going to the old regulator, and you are good to go.
The three-wire setup is a bit more involved. Mount the alternator and attach the 'B' terminal. On the alternator there are two terminals at the 12 o'clock position. One is marked 'S' and the other is marked 'L'. Both of these terminals can be powered from the black/white strip wire going to the old regulator. It comes from the ignition switch and powers up when the key is turned on. The 'S' is wired straight to the black/white wire. The 'L' goes to the cathode of a diode. The anode of the diode goes to the black/white. (see diagram) A readily available 1N5404 diode will work and can be purchased at any electronics store for about a buck. Unfortunately I was unable to locate a pigtail for this alternator. If anyone makes it I couldn't find it. Therefore it requires the use of crimp-on ¼" female spade lugs insulated with heat shrink tubing. It sucks but that's the way it is.
(Technical explanation) The 'S' terminal is the sensing input. It monitors the voltage level of the wiring system and adjusts the output of the alternator accordingly. As the load increases the voltage will drop. This terminal senses this and adjusts the output to maintain 14.4 volts (give or take). The 'L' terminal serves two functions. One is the 'idiot light' that lights up if the alternator fails. It also applies power (through the idiot lamp) to the regulator to start the alternator. Unlike a generator, an alternator needs power from the battery (called exciter voltage for anyone that's interested) to achieve an output. If the 'L' terminal is wired directly, voltage will feed back into the ignition circuit. This will cause the engine to continue running after the key is turned off. Oops!! The diode is like a check valve. It only allows the electricity to flow in one direction thus preventing this embarrassing situation.
One thing I certainly would recommend is getting the alternator out from under the exhaust manifold! This kind of heat will certainly do it no good whatever.
I opted to use the air pump mount bolted to the block along with a steel plate attached to two of the timing cover bolts. This gives good support to both the front and rear of the alternator and maintains axial alignment when the belt is tensioned.
The front mount is a triangular piece of ¼" steel plate with three holes drilled in it. This is about as simple as it gets. Two of the holes have to line up to the timing cover and the third aligns with the air pump mount. It takes a bit of time and patience but it is not difficult to accomplish. The front alternator ear mounts to the front of the plate. This aligned the belt center within about 1/16". A piece of 3/8" pipe welded to the front bracket gives support between the front and back ears and the back ear butts up against the air pump bracket. A small amount will need to be shaved off the front of the air pump mount. Somewhere around .060" if I recall. It makes a nice neat package that is very strong. The bolt is quite long so a piece of 5/16" drill rod with the ends threaded was used. Here is a picture of the completed alternator installation.
TIMING CHAINS
For anyone that hasn't done this it might seem a bit intimidating. It really is a straight forward job. Remove the hood, radiator, and radiator mounts. Just pull the four bolts holding the radiator brackets in place and remove the mounts with the radiator attached. For the few minutes invested it will make the job a lot easier. Next the alternator, water pump, inspection cover, and valve cover are removed. Last but not least is the oil pan. It has to come off due to the studs in the timing cover. It would have to come off anyway as the cork gasket will be thoroughly stuck to the bottom of the timing cover.
EXHAUST MANIFOLD REPLACEMENT
Next comes the harmonic balancer. Remove the center bolt. It will take a fair amount of pulling as it is torqued to 150 fl/lbs. If you don't own a stout impact wrench you'll have to do it the old fashioned way. Put the tranny in gear and set the hand brake or it will never come loose. Turning the engine backwards is not a particularly good idea either. Now set the engine to TDC. Check the valves to make sure that you aren't 360 degrees off. Both valves on number 1 cylinder should be closed. They were kind enough to provide two holes for attaching a puller. DO NOT try to pry it off!!! You will likely end up cracking the timing cover. You really don't want to find out what one these sells for. Don't forget to remove the woodruff key from the crankshaft.
If the harmonic balancer has grooves cut into it from the front seal (generally a safe bet) you have two options: Replace it or fix it. To fix it you need to get a press-on sleeve to cover up the grooves. They work quite well and are much cheaper than having yours rebuilt. Plus the rebuilder will use the same sleeve. But, the rubber will be replaced as well. This runs about 100 bucks. A new one will run close to 400! If the rubber is in good shape just get a sleeve and save yourself a bunch of money. National Redi-Sleeve # 99189 is one that will fit. It appears that the U20 balancer is an odd-ball size that only National makes. Big surprise there!! I've heard that there are others but I couldn't find any the right size for the U20. Not to mention that this item was $40!! All of the common sizes available from multiple manufacturers run about $10. Damned thieves.
Removing the timing cover is a bit more interesting. The top edge of the cover mates to the head. The seal is achieved by the head gasket. If the gasket gets damaged it will have to be replaced. This really sucks to say the least. As an added attraction the front two corners have studs that go through the head. The studs can be removed with minimal difficulty. Gently tap around the top edge of the timing cover with a plastic hammer to (hopefully) loosen the gasket. Now work around the edge of the timing cover. Work it away from the bottom first. There is a locating stud on each side to align the cover. Work the bottom out first. This will cause the cover to angle slightly outward pulling the gasket loose (hopefully) where the head and block come together. With any kind of luck the gasket will remain stuck to the head and pop loose from the timing cover. If it doesn't don't say I didn't warn you.
Lightly tap around the inside of the main seal in the timing cover. Take your time and tap it out as evenly as you can to prevent damaging the timing cover. The new seal should be pressed in. Don't pound it in with a hammer! An arbor press is the tool of choice but few people have one available. A good alternative is a large bench vise. Lightly (VERY lightly) tap around the edge of the new seal to just get it started. Get a small scrap of 2x4 to support the back and a large socket (piece of pipe, whatever) that is the same diameter as the seal. Center the whole thing up in the jaws of the vise and slowly press the seal into place. Crude but effective.
The first thing is to take off the chain tensioners. They are each held on by two bolts. Behind the bolt heads is a thing that looks like a flattened barbell. One side will be bent against a flat on each bolt. Bend them flat and remove the bolts and tensioners.
Now we get to the chains and gears. There is a bolt in the center of the jackshaft gear. Pop it with an impact wrench to prevent knocking it off of TDC. Remove the oil slinger from the crank. The crank and front jackshaft gears should slide off together. If the crank gear sticks push them back on and polish the shaft with crocus cloth. If the keyway has ridges along the side (common) touch it up with a fine file. Remove the two bolts and the locating pin from the camshaft. The locating pin looks like a Phillips head screw at the top of the gear. Remove the camshaft gear and take the chain off of the inner jackshaft gear. Now remove the jackshaft gear. Remove and replace the upper chain guide. The lower chain guide is another matter. They are known for breaking off. Mine had done so many years ago. Some people recommend leaving them out. I spoke with Gordon Glasgow about it. He had his reinforced at a welding shop but said he didn't see any problem leaving it out. I opted to leave mine out. You'll have to make your own decision.
Place the new inner gear on the jackshaft. Attach the chain and pull it up to the camshaft. Tie it out of the way or slip the cam gear in and screw it to the 'L' bracket. Next is the lower chain and gears. There is a dimple drilled into each gear. These are the timing marks. Make sure these are pointing toward each other when the chain is in place. Now slide the gears back on the crank and jack shaft. If the jack shaft is out of position just rotate it as needed to align the keyway to the gear. Align the cam gear to the shaft and replace the bolts. Just lightly snug the bolts and insert the locating pin. You might have to give it a light tap with a plastic hammer. Chances are that the cam will be off just a touch due to chain stretch. After the pin is in place tighten the bolts. PUT THE OILSLINGER ON THE CRANKSHAFT RIGHT NOW!! There is nothing like going to the trouble of putting the timing cover back and discovering you left the oil slinger off. Replace the bolt in the jackshaft and torque it to 35 ft/lbs.
The lower chain tensioner is easy to get into place as you can get your hands on it. The upper is a PIA. The best way I know is to put it together and lock it in place with a nylon wire tie. Jockey it into position and start the bolts. It sits at an angle slightly counter clockwise. After it is bolted in cut the wire tie. Bend the keeper tabs (the barbell looking thing) against a flat on each bolt as shown here. From here on in it is just a matter of bolting everything back on in reverse order.
DO NOT USE GASKET SEALER ON THE TOP OF THE TIMING COVER! You may need to remove it at some future time. Gluing it to the head gasket will increase the possibility of having to pull the head the next time. Leave the timing cover bolts loose and snug up the studs (or bolts if you replaced them) that go through the head and into the timing cover. Then tighten the remaining bolts.
I would also recommend using a torque wrench to replace the oil pan. This may sound anal to some but it doesn't take much to mash the cork gasket. And once that happens it will leak forever. A few minutes with a torque wrench will insure it doesn't. Specs call for 43 in/lbs. That's INCH pounds, not foot pounds. Liberally grease the seal area of the harmonic balancer and the inside of the seal. Put the woodruff key in place and slide the balancer on. Look carefully to make sure that the lip of the seal didn't get hung up and turned inward. Torque the harmonic balancer bolt to 150 ft/lb. Again, place the tranny in gear and set the hand brake to accomplish this task.
Replace the water pump, radiator, and hood. You should now be good to go. I doubt that the ignition timing has changed enough to matter but it wouldn't hurt to check it just to make sure.
Replacing the hood is a pain. The least difficult way to accomplish this is to remove the grill. With the grill removed you can reach up inside (sort of) and tighten the bolts while holding it in proper alignment. Otherwise you could spend the rest of your life trying to get it aligned.
Most factory manifolds crack sooner or later. They are very rigidly attached to the motor. The exhaust system is very rigidly attached to the frame. The motor moves around a good deal. In such a situation something has to give. In the case of our Roadsters it is the manifold. A simple piece of flex at the collector will remedy this but Datsun failed to do it. Therefore we wind up with a bunch of cracked manifolds. Repairs are generally futile so this leaves replacement. The cost of a new manifold (if you can even find one) generally results in heart failure. This leaves used ones or headers. Headers do not fit near as well as the factory manifold and are really of no value performance wise but they are much cheaper. I opted for a replacement manifold (used) and had it Jet-Hot coated.
This was a real joy! For those that have never attempted this daring little feat it is only fair for me to warn you: It can't be removed with the engine in place. No way, no how, not in this lifetime. Well, actually it can be removed but it involves the use of a Sawzall. This works well for removing it but does little to accomplish its replacement. If you are going back with a header just cut out the manifold and see if the header will fit back in. To replace the manifold the engine has to be jacked up on the driver's side. On to the deed at hand
..
Some prefer to remove the intake manifold with the carbs attached. Personally I find that it is far easier to remove them. Trying to get to the manifold nuts (especially replacing them) is more trouble than it's worth.
First, unhook the throttle and choke cables and all of the plumbing lines from the carbs. Don't forget the throttle return springs that hook to the heat shield. Then remove the front carb followed by the rear. The rear is a PIA to get out and a lot harder to get back in. (Side note: Get an 8 m/m wrench. Clamp the box end in a vise. Heat the handle where it attaches to the box with a torch and bend the handle until it is straight up. Come up the handle about an inch-and-a-half, heat it with the torch, and bend it at a right angle. For you older folks it will now resemble a Chevy distributor wrench. This makes it far easier to get the nut off of the lower right corner of the rear carb. If you decide to try it with a standard wrench I have only one thing to say: Good luck!!!) After the carbs are out remove the heater/bypass hoses, the exhaust and intake manifold nuts. BTW, put a catch pan under the car. There are coolant passages in the intake manifold and it can make a nice little mess when it breaks loose.
As previously stated, removing and replacing the exhaust manifold requires jacking up the engine on the driver's side. Remove the two bolts holding the engine mount to the frame. The front bolt threads into the frame while the rear has a nut on the underside. Thoughtful bastards are they not? Now jack the engine up as far as it will go. Don't worry about the mount on the other side. It will stretch far enough without getting damaged. If it doesn't it needs to be replaced anyway as the rubber is getting hard. Remove the exhaust manifold.
Stop. Right now. I suggest, in the strongest terms possible, that you remove the starter and have it checked out by your local rebuilder. Now is the time to make absolutely sure that it is in perfect condition. Removing the starter from a U20 engine is a gold plated bitch with the exhaust manifold in place. If you have a header it is pretty well impossible to do without removing the header. Do it now while it is already torn down and easy to get to. Just a suggestion based on experience.
Once the manifolds are out of the way stuff the intake and exhaust ports on the head with paper towels and scrape off all remaining traces of the old gasket. Scrape or wire brush the gasket surfaces on the intake manifold. Remove the toweling from the ports and place new gasket over the studs. Drop the exhaust manifold into place and lower the engine. Work the collector onto the exhaust pipe then slip it onto the studs in the head. Put a nut on the two end studs to hold it in place. Hand tight will do for now. Replace the intake manifold and place a nut on the two top, inside studs. Again, just hand tight to keep it from falling off.
There are flat washers, lock washers, and some really thick washers. The thick ones are cupped and are used on the studs that are common to both manifolds. They should be installed with the convex side out. Once the washers and nuts are in place torque the nuts to 10 ft/lbs. The two end nuts on the exhaust manifold will require the use of a crows foot. Be sure to bolt the exhaust manifold bracket to the engine mount. It is necessary to keep the manifold rigidly in place.
NOTE: The nuts that go under the float bowls (lower right on the front carb and lower left on the rear) have to be started first. The studs are so close to the bowls there isn't enough clearance for the nut to go on the stud. To get them started the carbs must be pulled forward slightly.
Replace the rear carb first. Put the washers and nuts on (starting with the lower left) hand tight. Getting the lower right hand washers and nut into place is a real PIA! There is limited room and the steering shaft is in the way to boot. Once they are all started tighten them down and replace the front carb. Don't forget the heat shield that goes between the carbs and manifold! It's a real joy to have to remove and replace the carbs because you forgot the heat shield. Ask me how I know
.
Now it's just a matter of replacing the plumbing, linkages, springs, and air cleaner(s) and you are good to go. I would recommend that you don't bother to reconnect the exhaust. Just take it to the local muffler shop. Have them install a piece of flex and let them reconnect the exhaust.